![]() A little theory
A little theory
Within mapp View we have meanwhile a lot of widgets, which allow many different use cases and provide a lot of functionality. As always when using a framework, providing ready made widgets / features is always a trade-off, between functionality and maintainability, so it is natural, that now everything customers might want is possible out of the box. Often such feature requests are carried to product management, to get them implemented … and too often such requests get rejected, as for R&D it is a lot of work and does not really pay back.
But exactly for that challenge, we have meanwhile the Widget Development Toolchain (WDTC).
Using the WDTC it is possible to provide additional functionality, in an easy and straight forward way – without R&D. Here are two nice examples.
![]() The first example.
The first example.
One customer wanted to have mapp View dialogs with “glass effect”. A glass effect is a CSS based style, which blurs the background and adds some special shadows to the content. Out of the box, this is not possible with mapp View – but it is easy to create a widget, to provide such a glass effect:

Creating this widget is actually not rocket-science, as the widget does not need to provide too much functionality. Effectively it is a “DIV”, which has some special CSS settings applied. The CSS settings you can have ChatGPT & Co creating for you.
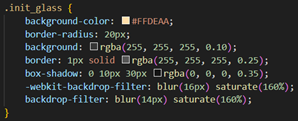
The needed JavaScript is simple, as you mainly need to initialize a basic widget – how this is done you find in the help or tutorial (just copy it). It is even possible to have the different CSS settings to be configurable.

… the “trick” here is, that the CSS settings are exposed as string to Automation Studio – this is of course a workaround and has some drawbacks (e.g. not syntax check), but it does not cause too much work and for a single project, to get this effect, it should be acceptable!
![]() The second example is a special gauge
The second example is a special gauge
Mainly a “color ring”, with a pointer. Mapp View provides a gauge, but you cannot style it as needed. But you can – again with the help of ChatGPT & Co – create your own gauge:

This one is a little more complex – as you need two DIVs ![]() … and little more knowledge about CSS – but AI comes in very handy here, and solves most of your problems. The gauge of course also needs a data binding and some “glue code”, but you can have AI most of this generated for you. The “trick” here is to ask AI to generate a (single!) web page and have e.g. a JavaScript function to update the gauge. You can then copy the code and encapsulate it as widget … Making the gauge styleable is again done by exposing the CSS settings directly.
… and little more knowledge about CSS – but AI comes in very handy here, and solves most of your problems. The gauge of course also needs a data binding and some “glue code”, but you can have AI most of this generated for you. The “trick” here is to ask AI to generate a (single!) web page and have e.g. a JavaScript function to update the gauge. You can then copy the code and encapsulate it as widget … Making the gauge styleable is again done by exposing the CSS settings directly.
The main concept / knowledge needed are part of the help and tutorial.
While the WDTC for sure cannot solve all problems, it is in many cases much easier to create widgets for specific needs as most think! If a customer has special styling needs or requires special widgets, looking into the WDTC prop. is a good idea!
Are you interested about implementation details? Check tutorial source files ( Spinner sample form WDTC online course ).
![]() tutorial.zip (134.7 KB)
tutorial.zip (134.7 KB)