Hi,
so after some challenging experience with inheriting widgets, I would like to share a little guide on how to inherit very basic widgets. For this tutorial, we use the numeric widget.
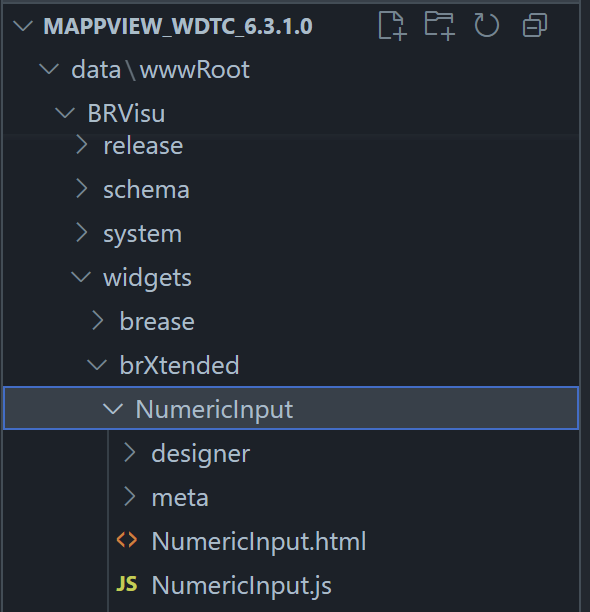
Create a new widget library folder (brXtended) in your WDTC folder under "\data\wwwRoot\BRVisu\widgets" and add a new folder with your widget name under that. Inside the widget folder, create the two folders “designer” and “meta”. Create a .html and .js file so that the overall structure looks like this:
The .html file is very simple and only has this line:
<div id="WIDGETID" data-brease-widget="widgets/brXtended/NumericInput"></div>
It tells mappView that there is a new widget in the library “brXtended” with the name “NumericInput”
The .js file contains the main JavaScript code. On the left is the code for the derived widget, and on the right is the original numeric widget for comparison. I don’t explain every line of code, just the important parts.

Let’s start at the very top. For the “define”, we reference “widgets” which gives us access to all standard widgets (brease). The name in our function should also be “widgets”. If you like, you can also reference just a specific widget inside “widget.brease” but for simplicity reasons, we just go with “widgets”.
![]() Keep in mind that the term brease exists at multiple locations. Just “brease” gives you access to common functions, “widgets.brease” gives you access to the standard widgets.
Keep in mind that the term brease exists at multiple locations. Just “brease” gives you access to common functions, “widgets.brease” gives you access to the standard widgets.
For the class, we use our own name which uses “widgets . our library name . widget name”
@class widgets.brXtended.NumericInput
The standard numeric widget derives from the base widget so it uses that for the extend. We want to derive from the numeric widget so we use
@extends widgets.brease.NumericInput
The block after that is identical to the derived widget, it describes how the widget is categorized in Automation Studio and should be self-explaining.
The next important change in our code is the class constructor.

Here, we have to point to the standard brease widget and call apply
    const WidgetClass = widgets.brease.NumericInput.extend(
        function NumericInput() {
            widgets.brease.NumericInput.apply(this, arguments);
        },
        defaultSettings
    );
We override the init routine with our own parameters
    p.init = function () {
        this.addInitialClass("brXtendedNumericInput");

        // breaseNumericInput css class should not be added
        widgets.brease.NumericInput.prototype.init.call(this);
    };
This is all that is required to get the same functionality as the standard numeric widget.
We can now extend the widget with our own methods, for example opening the num pad with an action
    /**
     * @method openNumPadExt
     * @iatStudioExposed
     * Opens the numeric keypad.
     */
    p.openNumPadExt = function () {
        this._showNumPad(this);
    };
Don’ (t) forget to return the class at the end
return WidgetClass;
Here is the complete code for the custom widget
brXtended.zip (67.6 KB)